Reviewed by: Constantin Rezlescu | Associate Professor | UCL Psychology
If you never worked with Testable before, you can check out our 10-minute introduction video here
The Flanker task was originally described by Eriksen & Eriksen (1974) as a test of participants’ ability to inhibit conflicting but irrelevant information using a simple experimental paradigm.
The main effect demonstrated by the Flanker task is that participants take longer to respond to a target stimulus if it is ‘flanked’ by distractor stimuli that suggest a different response. For example, it is more difficult to match the direction of an arrow on screen by pressing the respective arrow key on your keyboard, when the surrounding arrows point in the opposite direction.
This delay is also longer than when adding distractors that evoke no response, but make the target harder to recognise. This shows that it takes effort to select between the competing responses elicited by the target and misleading distractors. This step of choosing an appropriate action based on what we see occurs after we process our visual scene.

The setup for the Flanker task is straightforward. In each trial, the stimulus is shown for unlimited time until the participant responds to advance to the next trial. Stimuli in Flanker tasks are typically composed of a target image in the center which is flanked by one or more distractor stimuli on either side.
Depending on the version of the task you are using, a different response might more sense. For a Flanker task with arrow stimuli it makes sense to allow responses with the left and right arrow keys. For colour or letter versions you might instead allow the 0 and 1 keys, as they lie comfortably on either side of the keyboard. In our demo template you can find implementations for three versions with which you can experiment.
The key manipulation in any Flanker task is the congruency of target stimulus and its flankers:
This is an illustration of the various stimuli setups in the flanker task

Run this experiment in Testable from our ready-made template
We have created a template for a typical Flanker task in Testable that you can access from our Library. It is set up and ready to go and you can start collecting data straight away by sending the experiment link to your participants after importing it to your projects. Experiments in Testable will run in every browser, which makes it very easy to collect data both in the lab as well as online.
Experiments in Testable are fully customisable and you will not need to write a single line of code to edit them. The heart of each experiment is what we call the trial file. The trial file contains all information that Testable needs to run the experiment in a simple spreadsheet, that you can edit with any spreadsheet editor you like, such as Google Sheets, Excel or Testable’s in-built preview editor.
To change any part of your experiment, you only need to change the values in the trial file.
Once you have made your changes, you can save and upload the modified trial file to your experiment’s trial file section.

Here are a few examples of changes you might want to make to the Flanker Task:
Change the stimuli
You can upload your own, custom stimuli to the stimuli library of your Testable project. Once uploaded, you can access them using the stim (stim1, stim2, stim3 etc.) columns of the trial file. Add the names of the image files you want to show to these columns and make sure that values in the stimFormat column match the format (.png, .jpg, .gif or .bmp) of the images that you uploaded.
Experimental conditions
As the congruency of the stimuli entirely depends on the stimulus, you can easily change the trial types by swapping out the images in the stim (stim1, stim2, stim3 etc.) columns. You’ll see that for the letter and arrow versions single stimuli are used that include targets and flankers. In the color versions, three separate stimuli are used, two for the flankers and one for the target that you can individually configure to get you the trials you need.
Allowed participant responses
Typically, participants respond by using the keyboard in flanker tasks. To change the allowed keys, you can add or delete characters in the keyboard column of the trial file. To allow the letters ‘P’ and ‘Q’ for example, you would have to enter ‘p q’ in the keyboard column.
After importing this template to your library, you can collect data for your experiment by sharing the unique experiment link (i.e. tstbl.co/xxx-xxx) with your participants. Once participants complete the experiment, their results will appear in the ‘Results’ section of your experiment.
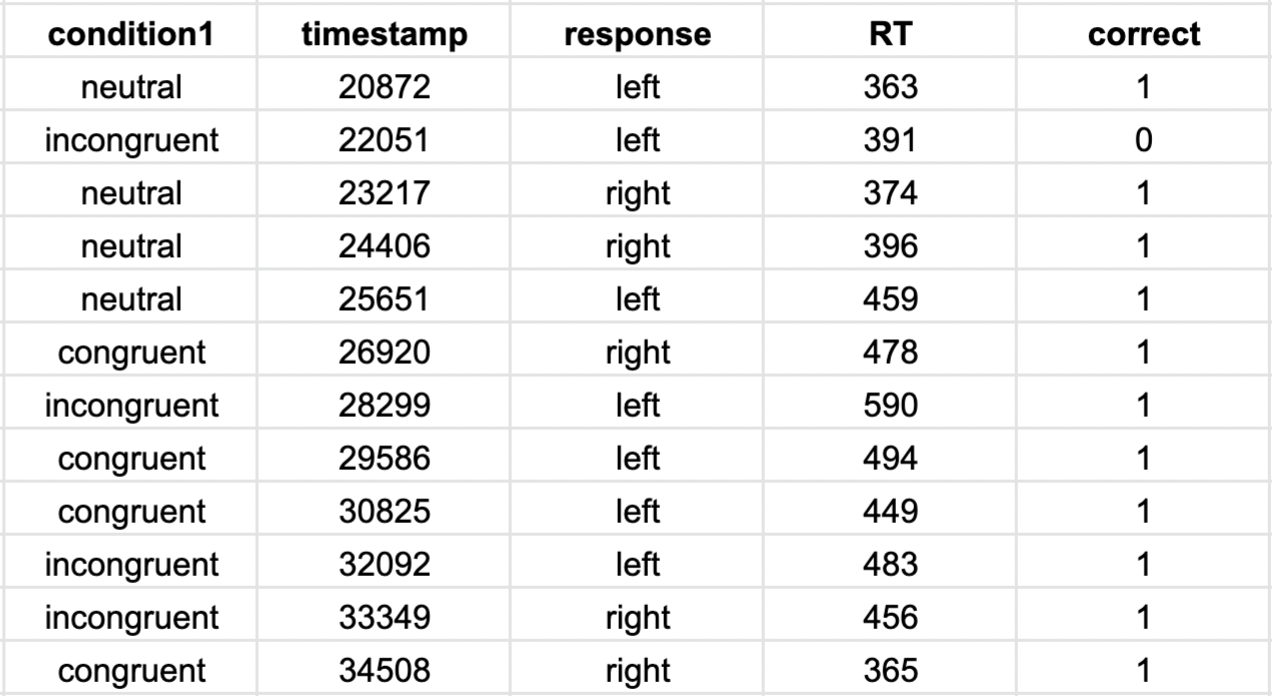
The main effect you will want to compute after running the flanker task is the difference in reaction times between congruent and incongruent trials for the correct responses only. This is referred to as flanker interference
The results file for the flanker task stores the response (column response), the accuracy (column correct) and the reaction time (column RT). We added the condition1 column to the trial file and it will also show up in the results. This column is a convenient shorthand that allows us to group the data in RT column for analysis.
Reaction time results appear in milliseconds. For a quick visualisation of the effect, you can compute the group averages for the different conditions and then plot the results in a simple graph.
Of course, you will probably want to test the results of a sample of participants for statistical significance. You may find it easiest to use Testable’s ‘wide format’ option, that automatically combines all individual results in a single file that is compatible with the expected format of most statistical analysis packages, such as R or SPSS.
Reference list:
Eriksen, B. A., & Eriksen, C. W. (1974). Effects of noise letters upon the identification of a target letter in a nonsearch task. Perception & Psychophysics, 16, 143-149.
Gehring, W. J., Gratton, G., Coles, M. G., & Donchin, E. (1992). Probability effects on stimulus evaluation and response processes. Journal of Experimental Psychology: Human Perception and Performance, 18(1), 198.t
Verbruggen, F., Notebaert, W., Liefooghe, B., & Vandierendonck, A. (2006). Stimulus-and response-conflict-induced cognitive control in the flanker task. Psychonomic Bulletin & Review, 13(2), 328-333.